Sewing velcro with a machine is a useful skill that can make your sewing projects much easier and more efficient. Velcro is a versatile and durable material that can be used for a variety of applications, such as closures for bags, garments, and other items. In this article, we will discuss the steps involved in sewing velcro with a machine.
Step 1: Choose the Right Velcro
Velcro comes in different sizes, colors, and strengths. It's important to choose the right type of Velcro for your project. For instance, heavy-duty Velcro is suitable for bags and backpacks, while lighter weight Velcro is suitable for clothing and other lightweight fabrics.
Step 2: Prepare the Fabric and Velcro
Before you start sewing, make sure your fabric and Velcro are prepared. Cut the Velcro to the desired length and shape. Also, mark the spot where you want to attach the Velcro on your fabric.
Step 3: Set Up Your Sewing Machine
Choose the right needle and thread for your project. Set the stitch length to a medium or long setting. If your machine has a walking foot, use it to prevent the fabric from slipping while sewing. You can also use a regular presser foot if you don't have a walking foot.
Step 4: Sew the Velcro to the Fabric
Position the Velcro on the marked spot on your fabric. Pin the Velcro in place. Then, sew the Velcro to the fabric, starting at one end and stitching all the way to the other end. Use a straight stitch or a zigzag stitch to sew the Velcro to the fabric. Be sure to backstitch at the beginning and end of the seam to secure the stitches.
Step 5: Sew the Other Half of the Velcro
Repeat the same steps to sew the other half of the Velcro to the opposite side of the fabric. Make sure the two halves of the Velcro align properly so that they will stick together.
Step 6: Finish the Seam
Once you've sewn both halves of the Velcro to the fabric, trim any loose threads and remove the pins. Then, fold the fabric in half with the Velcro pieces facing each other. Sew the seam, making sure to leave an opening for turning the fabric right side out.
Step 7: Turn the Fabric Right Side Out
Turn the fabric right side out through the opening you left in the seam. Use a chopstick or a point turner to push out the corners and edges. Then, press the fabric flat with an iron.
Step 8: Close the Seam
Finally, close the seam by sewing over the opening with a straight stitch or a zigzag stitch. Backstitch at the beginning and end of the seam to secure the stitches.
In conclusion, sewing Velcro with a machine is a simple process that can be completed in just a few steps. With a little practice, you'll be able to sew Velcro quickly and easily, making your sewing projects more efficient and professional-looking.

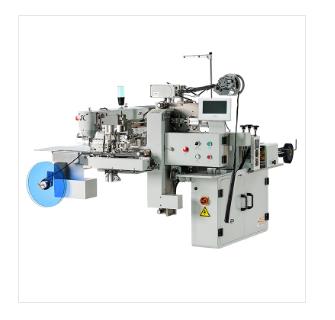
| Machine No. | JYL-M3020G-MST |
| Working Area | L80-200mm W:160-220mm |
| Maximum Sewing Speed | 2800 RPM |
| Maximum No.of Stitehes | 20000stitches/pattern |
| Outer Pressure Foot | Penumatic |
| Medium Presser Height | 15mm |
| External Presser Foot Lifting | 30mm |
| Motor | 750W Direct-drive Servo Motor |
| Applicable Needle | DPxl7 |
| Air pressure | 05Mpa 1.8L/min |
| Stored programs | 1-999 patterns |
| Operation Type | 7.5″ Led Touch Panel |
| Supply voltage | 220V single phase |
| Size | 155x1220x1600mm |
| Weight | 380KG |


