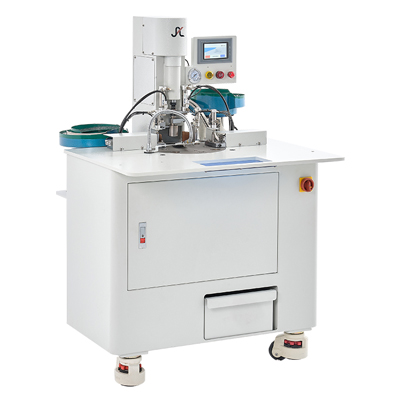
Button Wrapping Machines are specialized devices used for wrapping buttons with thread or fabric. These machines automate the process of securely fastening buttons onto garments or other fabric items. The machine holds the button in place while a rotating mechanism wraps the thread or fabric around the button, creating a neat and secure attachment. This automated process ensures consistency and efficiency in button wrapping, saving time and effort in garment production or textile manufacturing. Button Wrapping Machines are commonly used in the fashion industry and garment factories.
Using a button wrapping machine is a straightforward process that involves a few basic steps. Here is a step-by-step guide on how to use a button wrapping machine effectively:
1. Set up the machine: Begin by setting up the button wrapping machine on a stable surface. Ensure that it is securely positioned and that all necessary components are properly attached.
2. Adjust the settings: Most Button Wrapping Machines allow you to adjust various settings to accommodate different button sizes and types of thread or fabric. Consult the machine's user manual to learn how to adjust these settings properly.
3. Prepare the button: Before wrapping the button, ensure it is clean and free from any debris or loose threads. Place the button into the designated holder on the machine, ensuring it is centered and secure.
4. Attach the thread or fabric: Depending on the machine design, you may need to attach the thread or fabric to the machine's mechanism. This can typically be done by threading the material through designated guides or inserting it into specific holders.
5. Initiate the wrapping process: Once the button and thread/fabric are prepared, you can initiate the wrapping process. This is usually done by pressing a foot pedal or activating a button on the machine. The machine's rotating mechanism will start to wrap the thread or fabric around the button.
6. Control the wrapping: Pay attention to the wrapping process to ensure the thread/fabric is evenly and tightly wound around the button. Adjust the tension or speed controls if necessary to achieve the desired result.
7. Finish and secure the wrapping: Once the button is fully wrapped, stop the machine's operation. Use scissors or a cutting mechanism (if available on the machine) to trim the excess thread or fabric, leaving a neat and clean finish. Some machines may also have additional features for securing the wrapping, such as applying a small amount of adhesive or knotting the thread.
8. Repeat as necessary: If you have multiple buttons to wrap, repeat the process using the same or adjusted settings for each button.
9. Clean and maintain the machine: After completing the button wrapping, clean the machine to remove any accumulated thread, fabric, or debris. Follow the manufacturer's instructions for proper maintenance and lubrication to ensure the machine performs optimally for future use.
By following these steps, you can effectively use a button wrapping machine to automate the process of securely attaching buttons onto garments or fabric items.


